I do purchase some items cheaply at antique stores. For instance, the ceramic dove salt and pepper shakers, that I covered in gold leaf for one of my current projects, were perfect additions to that piece. They were inexpensive, too. Still, there is another type of place that I sometimes frequent to find the odd object to include in an altarpiece—discount stores. TJ Maxx and Marshall’s have been particularly helpful. Other stores that carry home decorations are also great. The resin or plastic items often found at those stores can be particularly interesting.
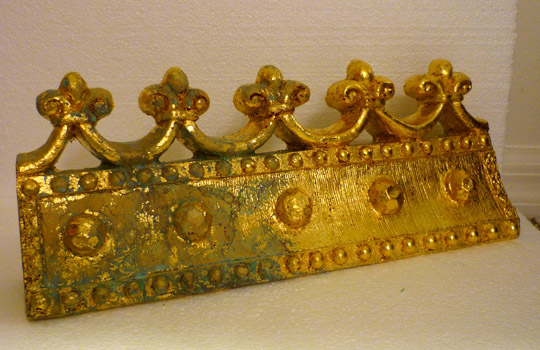
I do not recall where I picked up the resin shelf pictured here, but it turned out to be just the thing I needed to top off one particular work. I had been stumped on how to complete a work whose design had evolved several times and this turned out to be the perfect solution. However, I realized that turning the piece upside down was the best use for my particular needs.

The next alteration was designated for the finish of the piece. Though the patina of the shelf looked like aged metal, I knew that it would not complement the other surfaces of the piece, so I would need to change it. The photographs here show the process of changing the surface. I have written at other times about adding gold leaf to objects, but this will actually show the individual stages.
The surface of the object was first prepared by lightly sanding. Paint adheres best when the surface is slightly roughened. The entire surface was then covered with a deep red acrylic paint. I usually have to apply the paint in several steps since some sections need to dry before I can flip the object over and paint other areas. The traditional color of the undercoating for gold leaf is slightly more brown, but I like the contrast that comes from this more intense red, especially in the instances when I age the leafing.

Next, the surface is covered with an adhesive. It is brushed on as a milky white liquid, but dries to a glossy clear, sticky surface. Again, this has to be applied in stages since the adhesive will either stick to my hands or anything else if the whole surface is covered at once. In the meantime, the gold leaf is applied to the dried adhesive layer. Adhesive and leafing layer s are alternated until the entire object is covered.
The final steps are dependent on whether or not I want the object to be a shiny, pristine gold, or whether I want an aged and worn surface. For this piece the surface needs to be aged. A liquid chemical aging agent is then brushed over the surface. It is actually produced to create a green patina on copper materials. I do not use real gold leaf for this very reason. I use brass leaf that mimics gold. It is not because of the cost of gold—though that can be particularly expensive. The inclusion of copper within brass allows the leaf to be aged in a similar way. Sometimes the leaf all but disappears, making an abstract design in which mostly the red underpainting shows through.

The final stage of the process is the application of a final layer of polymer clear coat. This protects the gold surface from mars or scratches. It also keeps the brass leaf from changing. If it is needs to be kept pristine, it will be kept from any green oxidation. If it has already been aged then the oxidation is fixed at that point.